Owners set what can be bought on Billing, and how much usage credit can be spent on Usage, for the whole organisation and for each member.
Choose the limit you need
| Limit | Where | What it controls | Who changes it |
|---|---|---|---|
| Purchase limits | Organisation Billing | Seat plans, how seats are billed, the most seats, and whether usage credit can be bought and the most per purchase | Owners |
| Spending limits | Organisation Usage, or Settings → Usage for your own | Whether usage credit can be used, the monthly limit, the limit per request, the default member limit and products | Owners, or you for your own account |
| Member limits | Organisation Usage | One member's own monthly limit | Owners and billing admins |
| A seat's Own limits | Members | Messages and token units a day for one seat | See seats and access |
Billing admins and billing viewers can see the spending limits but can't change them. Purchase limits and member limits are shown only to people who can change them.
Raising a limit doesn't add usage credit, give anyone a seat or send a request. Promotional credit comes off invoices and isn't affected by these limits.
Set purchase limits
Purchase limits are what billing admins can buy. Only owners can change them.
- Open the organisation's Billing page and find Purchase limits.
- Select Edit limits.
- In Edit purchase limits, tick the Seat plans that can be bought and how they can be Billed: Monthly, Annually or both.
- Enter Most seats, a whole number up to 500 across all seat plans.
- Turn Usage credit purchases on or off. When it's on, enter Most per purchase.
- Select Save. The confirmation lists only what changes, with each current value beside it.
- Select Change limits. Purchase limits shows the new values.
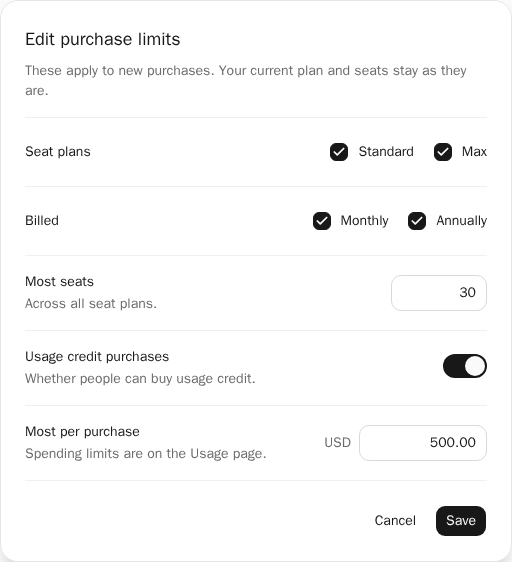
New purchases follow these limits. Your current plan and seats don't change, and a purchase already made isn't reversed. If a seat plan is no longer offered, the dialog asks you to untick it before you can save.
Set spending limits
- Open Usage and find Spending limits.
- Select Edit limits.
- Turn Usage credit on to let usage carry on after the included allowance runs out, or off to stop it.
- Enter the Monthly limit and the Limit per request. For an organisation, also enter the Default member limit, which applies to each member who doesn't have their own. A default of 0 blocks members without their own limit.
- Under Products, tick Chat, Code or both.
- Select Save, check the changes in the confirmation, then select Save limits.
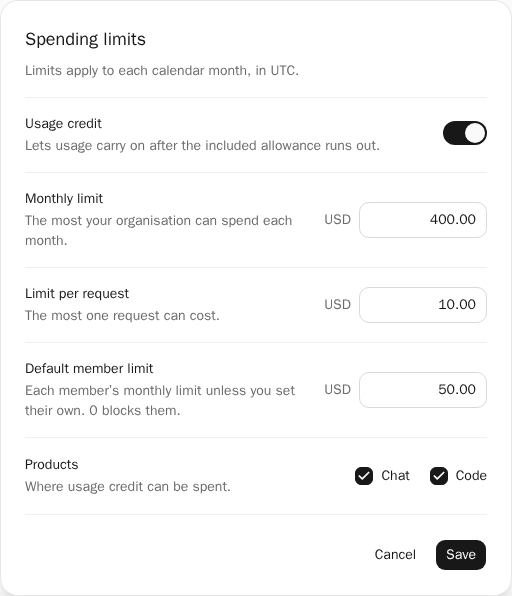
The limit per request and the default member limit can't be more than the monthly limit. With usage credit on, choose at least one product and set a limit per request above 0. Limits apply to each calendar month in UTC.
New requests use the new limits straight away. Replies already running finish, and nothing already spent is refunded.
Set one member's limit
Owners and billing admins can give one person their own monthly limit, up to the organisation's monthly limit.
- On the organisation's Usage page, find Member limits. It lists active members by name and email. Use Next page and First page to move through the list.
- Select Edit limit beside the person. The dialog says what applies now: the organisation default or their own limit.
- Turn Usage credit on or off for them, and enter their Monthly limit.
- Select Save. The confirmation says the result in one sentence.
- Select Save limit.
You see a member's limit when you open them; the list doesn't show who already has their own. A member limit doesn't give anyone a seat or access. Members see their own spending and limit in Settings → Usage while they chat as the organisation.
Review paid Chat usage
Where paid extra usage is available, choose who you chat as first, under Chat as in the account menu. Use credits on an allowance notice, or Use credits for this message in the composer's + menu, opens a review.
Check the message, files, mode and who it's Paid by. Enter Maximum for this message (USD), tick the statement that authorises up to that amount for this message only, then select Authorise and send this message. Cancel spends nothing. Changing the message or who you chat as means starting the review again.
If a request was already sent, open Paid requests to check and use Check status. Don't send the message again to find out whether it was charged.
If a change didn't finish
If a limit shows We couldn’t confirm your last change, the change may already have gone through. Check the values shown, then select Try again to send the same change again, or Discard to clear it from this browser. Trying again can't apply it twice, and discarding doesn't undo a saved change.
If someone changed the limits after you opened the editor, the message asks you to discard your change and make it again. If you're asked to sign in again, your change is kept, and signing in doesn't send it.