Invite people to your organisation and give them the roles they need. Invitations and roles are separate from paid seats: people join without a seat, and you give them one afterwards.
Before you start
Owners and identity admins can invite people and change roles. Seat admins and billing admins can open Members to see the list, but don't see Invite people or the role controls. Only someone who can give administrative roles, usually an owner, can invite an administrator or change an administrator's roles.
Open the account menu at the bottom of the chat sidebar, choose Organisation settings, check the organisation name at the top of the sidebar, then select Members. On a phone, use the menu at the top of the page to choose Members.
Send an invitation
- On Members, select Invite people.
- Enter the person's work email in Email address.
- Under Role, keep Member unless they need an administrative role.
- Select Send invitation. Check the address and roles in Send this invitation?, then select Send.
- Select Close. The address appears under Pending invitations with its role and when it expires.
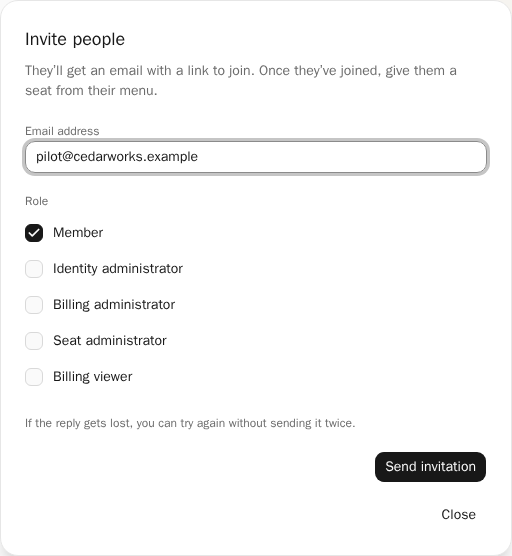
They'll get an email with a link to join. To send the link yourself, select Copy invite link next to their address under Pending invitations. You'll see Invite link copied; only the invited address can use it. If your browser can't copy, a dialog shows the link to copy by hand. Copying the link doesn't resend the invitation or change when it expires.
Once they've joined, give them a seat from their menu. See Assign seats and check product access.
Accept an invitation
- Open the invitation link and sign in with the exact email address that was invited.
- If your company's sign-in page opens, choose the work account for that address.
- Check the organisation name and the roles under You’ll join as, then select Accept invitation.
- Select Confirm invitation acceptance in Join this organisation?.
- To chat as the organisation, open the account menu and choose it under Chat as. Ask an owner or seat admin for a seat if Chat is blocked.
If the page says This invitation is unavailable to your signed-in account., compare the signed-in email with the invited address. Select Sign in with the invited account if they differ. The message can also mean the invitation was accepted, revoked or expired; it doesn't say which. Ask an administrator to check Pending invitations and the member list before they invite you again.
If accepting didn't get a reply, select Retry original acceptance. Signing in again doesn't accept an invitation for you.
Change a member’s roles
- On Members, find the person under People. Select Next member page if needed.
- Open the person's menu and choose Change role.
- In the dialog that opens, select the Roles they should have.
- Select Save. The list shows their new roles.
Only owners can change roles. Making someone an owner, or removing an owner, asks you to confirm first. You can't give up your own ownership until someone else is an owner; the dialog says You’re the only owner. Make someone else an owner first. when that's the case.
Changing someone's roles cancels invitations they sent that haven't been accepted. If you use single sign-on, each time someone signs in with it their Member, Seat administrator and Identity administrator roles are set from your identity provider's groups, replacing what you choose here. See Map group roles.
Owners manage everything, including billing and other owners. Identity admins manage sign-in, domains and directory sync. Seat admins give people seats. Billing admins and billing viewers manage or read billing. A role doesn't give anyone a seat, and a seat doesn't make anyone an administrator.
Recover or revoke an invitation
To withdraw an invitation, select Revoke next to the address under Pending invitations, then Revoke in the confirmation. The link stops working, and you can invite them again later. Revoking doesn't remove someone who has already joined; use Remove or restore organisation access for that.
An expired invitation no longer works. Use Invite people to invite the same address again; you don't need to revoke the expired invitation first.
If sending didn't get a reply, the page shows We couldn’t confirm an invitation. Select Open invitation, check Pending invitations, then select Try again. It keeps the same address and roles, and doesn't send an invitation twice. To drop it instead, select Discard, then Discard invitation. That only clears it from this browser.